10 KiB
sitespeed.io
![]()
![]()
![]()
![]()
![]()


![]()
Website | Documentation | Changelog | Mastodon
Table of Contents
- Welcome to the Wonderful World of Web Performance
- Introduction
- Installation
- Usage
- Contributing
- Reporting Issues
- Community and Support
- License
Welcome to the wonderful world of web performance!
Welcome to sitespeed.io, the comprehensive web performance tool designed for everyone passionate about web speed. Whether you're a developer, a site owner, or just someone curious about website performance, sitespeed.io offers a powerful yet user-friendly way to analyze and optimize your website.
What is sitespeed.io?
sitespeed.io is more than just a tool; it's a complete solution for measuring, monitoring, and improving your website's performance. Built with simplicity and efficiency in mind, it enables you to:
- Test Websites Using Real Browsers: Simulate real user interactions and conditions to get accurate performance data.
- Speed Optimization Feedback: Get detailed insights into your website's construction and discover opportunities for enhancing speed.
- Track Performance Over Time: Monitor changes and trends in your website's performance to stay ahead of potential issues.
Why Choose sitespeed.io?
- Open Source and Community-Driven: Built and maintained by a community, ensuring continuous improvement and innovation.
- Versatile and Extensible: Whether you're running a simple blog or a complex e-commerce site,
sitespeed.ioadapts to your needs. - Seamless Integration: Easily incorporate
sitespeed.iointo your development workflow, continuous integration systems, and monitoring setups.
Dive Into Our Documentation
We've put countless hours into our documentation to help you get the most out of sitespeed.io. From installation guides to advanced usage scenarios, our documentation is a treasure trove of information and tips.
Introduction
Sitespeed.io is a complete web performance tool that helps you measure the performance of your website. It is designed to:
- Test websites using real browsers, simulating real user connectivity.
- Analyze your page’s construction and provide feedback for speed optimization.
- Collect and maintain data on page construction for easy tracking of changes.
Use cases on when to use sitespeed.io.
- Web performance audit: Run performance tests from your terminal.
- Continuous Integration: Detect web performance regressions early in the development cycle.
- Production Monitoring: Monitor performance in production and get alerted on regressions.
Installation
Getting started with sitespeed.io is straightforward. You can install it using Docker or NodeJS, depending on your preference and setup. Follow these simple steps to begin optimizing your website's performance.
Docker
Using Docker is the easiest way to get started with sitespeed.io, especially if you don't want to handle dependencies manually. Run the following command to use sitespeed.io in a Docker container:
docker run --rm -v "$(pwd)":/sitespeed.io sitespeedio/sitespeed.io https://www.sitespeed.io/
This command pulls the latest sitespeed.io Docker image and runs a test on the sitespeed.io website. The -v "$(pwd)":/sitespeed.io part mounts the current directory into the container, allowing you to easily access test results.
NodeJS
If you prefer installing sitespeed.io as an npm package, ensure you have NodeJS installed on your system. Then, install sitespeed.io globally using npm:
npm i -g sitespeed.io
After installation, you can start using sitespeed.io by running:
sitespeed.io https://www.example.com
Replace https://www.example.com with the URL you wish to test. Note that using NodeJS might require additional dependencies like FFmpeg and Python. Detailed installation instructions for these dependencies can be found here.
Choose the method that best suits your environment and get ready to dive into web performance optimization with sitespeed.io!
Usage
sitespeed.io is tailored to be user-friendly, making web performance testing accessible regardless of your technical expertise. Here's a straightforward guide to help you begin your web performance optimization journey.
Basic Usage
To start testing your website, simply run sitespeed.io with the URL of the site you want to analyze. For example:
sitespeed.io https://www.example.com --browser chrome -n 5
This command tests https://www.example.com using Chrome and performs 5 iterations of the test. This approach helps in obtaining a more accurate median performance measurement by testing the site multiple times.
Advanced Configuration
sitespeed.io offers a wide range of configuration options to tailor the tests to your specific needs. You can specify different browsers, adjust connectivity settings, and much more. For a comprehensive list of all available options, visit our configuration documentation.
Additionally, for a quick overview of all command-line options, you can run:
sitespeed.io --help
This command displays all the available flags and settings you can use with sitespeed.io, helping you fine-tune your performance testing to fit your unique requirements.
Whether you're running a quick check or a detailed analysis, sitespeed.io provides the flexibility and power you need to deeply understand and improve your website's performance.
Examples
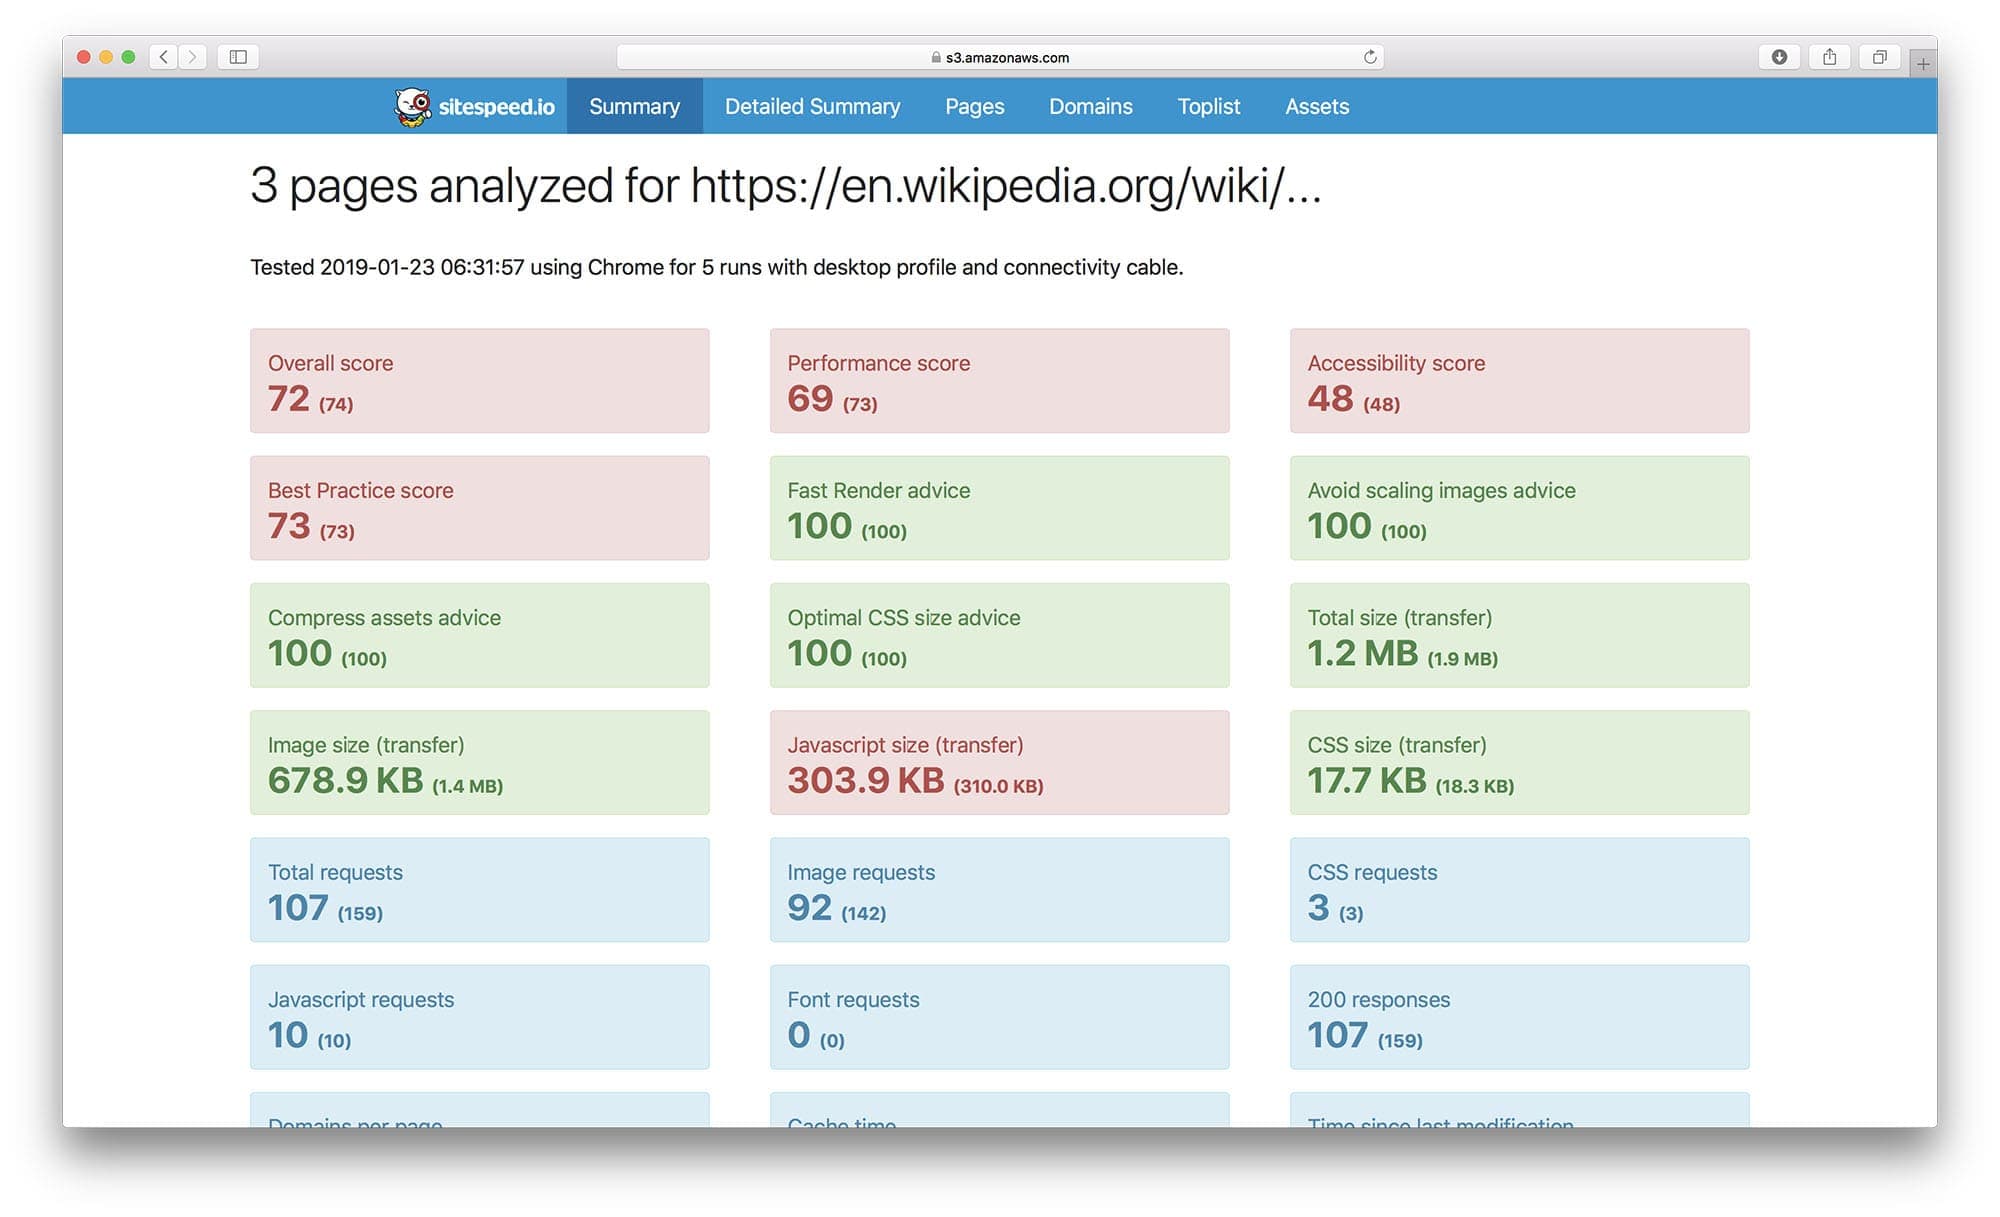
sitespeed.io generates HTML reports.
Here's an example of a summary report in HTML:
And an individual page report:

sitespeed.io makes it easy to monitor your websites performance over time. We have an example setup up and running at dashboard.sitespeed.io using sitespeed.io, Graphite and Grafana.
Collected metrics from a URL in Graphite/Grafana:

And look at trends in Grafana:

Video - easiest using Docker. This gif is optimized, the quality is much better IRL:
 s
s
Contributing
We welcome contributions from the community! Whether you're fixing a bug, adding a feature, or improving documentation, your help is valuable. Here’s how you can contribute:
- Create an Issue: Create an issue and discuss with us how to implement the issue.
- Fork and Clone: Fork the repository and clone it locally.
- Create a Branch: Create a new branch for your feature or bug fix.
- Develop: Make your changes. Ensure you adhere to the coding standards and write tests if applicable.
- Test: Run tests to ensure everything works as expected.
- Submit a Pull Request: Push your changes to your fork and submit a pull request to the main repository.
Before contributing, please read our CONTRIBUTING.md for more detailed information on how to contribute.
Reporting Issues
Found a bug or have a feature request? Please use the GitHub Issues to report them. Be sure to check existing issues to avoid duplicates.
Community and Support
Join our community! Whether you need help, want to share your experience, or discuss potential improvements, there are several ways to get involved:
- Slack: Connect with fellow users and the development team on Slack.
- GitHub Issues: For technical questions, feature requests, and bug reports, use our GitHub issues.
- RSS/Changelog: Latest releases and information can always be found in our RSS feed and in our changelog.
- Mastodon: Follow us on Mastodon https://fosstodon.org/@sitespeedio.
We're excited to have you in our community and look forward to your contributions and interactions!